
Common tools for the job
Explore the common tools used in Light Gauge Steel framing installations.
Explore the common tools used in Light Gauge Steel framing installations.
When first time Light Gauge Steel (LGS) users are asked what they would have liked to have known prior to going on-site, it is common to get a response about the right PPE and the correct tools.
While many tools used will be already available in general trade “tool kits”, in this topic, we look at a few common tools that make LGS installations both safer and more efficient.

When fixing walls to masonry or slabs, you will use a rotary hammer drill to drill holes through which to fasten the building frame to the concrete flooring system or foundations.
As always, the drilled holes need to have concrete dust and debris removed in accordance with the manufacturer’s recommendations to ensure the fasteners can reach their design capacity and be secured into hardened concrete (Some tools are available with inbuilt dust extraction).

This is a universal tool but the main purpose for LGS framing is for drilling holes using a range of accessories to create small to large holes. Can also be used for drilling masonry holes and as a driver for self drilling fasteners.
Accessories commonly used include drilling hole cutters, step drills and drills.


This versatile tool is used to screw the specified fasteners (both self drilling and self tapping screws) into LGS frames where required.
For ease of access when installing self drilling fasteners into the frame a range of drive bit lengths is recommended (from 50mm to 600mm) and a range of head drive bits (eg Phillips, Hex, Square heads).
TIP – clean any metal shavings from the anvil holder with Bluetack (Refer to the Video Cleaning a Magnetic Driver in the Resources section below).


Designed for fastening large foundation bolts and structural bolt fixings for steel connections (has much higher torque than hammer and impact drills). Should be used with Impact Wrench Sockets.
TIP – impact sockets are always black (chrome sockets are not suitable for impact wrench).


125mm angle grinder is most commonly used to cut the bottom plate for doorways.


These are used to cut metal sections and perform modifications on the frames.
Allows clean (burr free), fast and precise square cold cutting of LGS sections.
Ensure saw is fitted with a good quality cold metal cutting blade specified for use with thin LGS.

Innovations continue in tools designed to make working with Light Gauge Steel frames more efficient. Gun nailing technologies are becoming available that can make fit off work such as installing architraves quicker and easier such as this Paslode Steel Frame Brad nailer:

Collated nail guns such as the Iccons Structnail gun can be used to fasten fibre cement and weatherboard external claddings.

New screw gun technologies are also becoming available. For example, this gas powered Scrail Gun from Ideal Fasteners shoots screws that can secure particle board flooring and timber battens to light gauge steel frames.
And this Ideal Fasteners WrapMate automatically collates a plastic washer and screw and fires them into an LGS frame to secure pliable membranes.
These types of tool innovations can significantly save time in the installation process.

These are used to punch additional holes as required. (Option is to use Drill Driver with accessories as depicted above)

These are used to bend and shape when modifying LGS studs and noggins.

Clamps are key to frame assembly and serve to hold frames together prior to fastening.

Snips are used to modify the LGS frame.
Having right (red), left (Green), and straight cut/offset snips (yellow) allows easier access.
Other accessory items that will make working with steel easier include a Magnetic measuring tape and Magnetic level. A typical tool list for carpenters and installers is provided here.

This flyer shows the Makita® Complete light gauge steel framers kit and Standard light gauge steel framers kit.
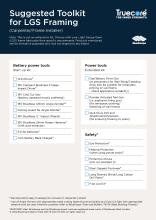
This checklist contains a basic list of tools required by a carpenter/frame installer, including battery power tools, power tools, accessories, hand tools, and safety PPE.


In this topic we look at the specific safety considerations when working with LGS framing and components.